Todoist projects keep related tasks together, so you can focus on one goal at a time. Use a project to plan a 3-day trip, track a marketing campaign, or keep a list of books to read. This guide shows you how to create, edit, share, archive, and delete projects, and how to organize them.
Identify project types
Every project lives in one of two places. Personal projects live under My Projects, and team projects live under your team name in the sidebar. Where a project lives decides who owns it and who can see it.
| Feature or purpose | My projects | Team projects |
|---|---|---|
| Primary use | Personal tasks or private work | Collaborating with teammates |
| Ownership | Account owner | Team admins |
| Project visibility | Account owner | All admins and members can browse, preview, and join any visible team project. Guests can only access projects they're invited to. |
| Working with external people | Share your personal project with friends and family | Share a team project with a guest |
| Public projects or View-only mode | Public projects | Public projects |
| Restricted access | Restricted by default | Restricted projects |
Create a project
Create a project for each goal you're working on. Give it a color so it's easy to spot in your sidebar.
Create a personal project
- Click the plus icon next to My Projects.
- Select Add project.
- Enter a name for the project.
- Click the hashtag icon to choose a color.
- Click Add project to confirm.
Create a team project
To create a team project from the sidebar:
- Click the plus icon next to your team name.
- Select Project.
- Enter a name and description for the project.
- Choose a color, access, folder, and layout for the project. You can skip this step.
- Click Add to confirm.
To create a team project from the workspace overview:
- Click the plus icon at the top-right of your workspace overview.
- Select Project.
- Enter a name for the project.
- Click the hashtag icon to choose a color.
- Add teammates by typing + followed by a name to choose an existing member, or an email address to invite someone who isn’t part of your team yet.
- Toggle the lock icon on to limit the project to invited people only, or leave it off so everyone on your team can access it.
- Click Add project to confirm.
You can also click + Add project at the bottom of the project list in your workspace overview.
Quick tip
- Tap Browse at the bottom-right.
- Tap the plus icon next to My Projects or your team projects.
- Select Add Project.
- Enter a name for the project.
- Choose a color and layout.
- Tap Done at the top-right to confirm.
Quick tip
Note
Make the most of your projects
Once your project is set up, use these tips to fill it with tasks and keep it organized.
Quick Add tasks to your project
Load up your new project with every relevant task you can think of. Use Quick Add to add tasks directly to your project. You can also click or tap Add task at the bottom of the task list. Think of it as a brainstorm. There are no bad ideas.

Stacey · Customer Experience Specialist
# in the task name, then enter the project name.
Organize with sections or folders
Break your project down into manageable chunks with sections. Add tasks or drag existing tasks to their relevant section.
If you’re working on a large team project with hundreds of tasks, break it down into smaller team projects and use folders to organize them. In a team, all projects live at the same level, so folders are how you group related work. Sub-projects (nested projects) are available in My Projects only.
Add dates
As you’re organizing your project, you’ll find that some tasks are due sooner than others.
To make sure you get things done on time, add a date and time to each task. These tasks appear in the Today and Upcoming views. You can view them as a list or board, or as a calendar on the Pro and Business plans.
Favorite a project
Add the projects you use most to your favorites so they're easy to reach in your sidebar. Turn on Add to favorites when you create the project, or at any time after.
Reorder your projects list
You can change the order of your personal projects by dragging them directly in the projects list under My Projects. There’s no separate drag handle, so you drag the project itself.
- Hover over a project under My Projects.
- Drag the project up or down to its new position in the list.
- Press and hold a project under My Projects.
- Drag the project to its new position in the list, then let go.
- At the bottom of your projects list, tap Manage projects.
- Tap the edit icon at the top-right.
- Drag the projects to reorder them.
For team projects, anyone on the team can sort projects alphabetically (A-Z) or in reverse (Z-A). Admins can also choose Manual to drag and drop projects into any order. Click the Sort menu above the projects list to choose.
Sorting by creation date or last modified date isn’t available.
Create project templates
If you find yourself recreating the same task lists frequently, you can save time and effort by creating a project template. These templates are saved to the My templates section in the Todoist templates gallery, so you can access them any time.
Quick tip
Edit a project
Projects change as your work changes. You can update a project's name, color, and description at any time.
Change the project name
- Click the three dots icon next to the project name.
- Select Edit from the menu.
- Enter the new project name.
- Click Save.
Quick tip
Change the project color
- Click the three dots icon next to the project name.
- Select Edit.
- Select the color you want for your project from the Color menu.
- Click Save.
Add or edit a project description
Give your project more context with a description that appears as a one-line preview below the project name. Hover your mouse over the preview to see the full description.
- Open the project from the sidebar.
- Click Add a description below the project name.
- Type your description.
- Click Save.
To edit an existing description, click it, make your changes, and click Save. You can also update the Description field when you edit the project. To format your description, highlight the text and use the toolbar.
Change the project name
- Tap Browse at the bottom-right.
- Swipe left on the project name.
- Tap the pencil icon.
- Enter the new name for the project in the Name field.
- Tap the checkmark icon at the top-right to save the changes.
Quick tip
Change the project color
- Tap Browse at the bottom-right.
- Swipe left on the project name.
- Tap the pencil icon.
- Tap Color.
- Select a different project color.
- Tap the checkmark icon at the top-right to save the changes.
Add or edit a project description
Give your project more context with a description that appears as a one-line preview below the project name.
- Open the project.
- Tap the project name at the top.
- Tap the text field and type your description.
- Tap Save.
Quick tip
Change the project name
- Tap Browse at the bottom-right.
- Scroll down the project list and tap Manage projects.
- Open the project.
- Tap the three dots icon at the top-right.
- Tap Edit.
- Enter the new name for the project in the Name field.
- Tap the checkmark icon at the top-right to save the changes.
Change the project color
- Tap Browse at the bottom-right.
- Scroll down the project list and tap Manage projects.
- Open the project.
- Tap the three dots icon at the top-right.
- Tap Edit.
- Select the color for the project.
- Tap the checkmark icon at the top-right to save the changes.
Add or edit a project description
Give your project more context with a description that appears as a one-line preview below the project name.
- Open the project.
- Tap the project name at the top.
- Tap the text field and type your description.
- Tap Save.
Quick tip
Project descriptions can be up to 16,383 characters.
The project color shows next to the project name in your sidebar, and on your tasks in the calendar layout when you color tasks by project. Projects without a color set, including Inbox, show gray.
Copy a link to a project
Every project has a unique link. Copy it when you want to share the project with others.
- Click a project from the sidebar.
- Click the three dots icon at the top.
- Select Copy link to project.
The project link is copied to your clipboard automatically.
Quick tip
- Tap Browse at the bottom-right.
- Open a project.
- Tap the three dots icon at the top-right.
- Select Copy Link to Project.
The project link is copied to your clipboard automatically.
Quick tip
- Open the project from the sidebar.
- Tap the three dots icon at the top-right.
- Select Copy Link to Project.
The project link is copied to your clipboard automatically.
Quick tip
- Tap Browse at the bottom-right.
- Open the project.
- Tap the three dots icon at the top-right.
- Select Copy link to project.
The project link is copied to your clipboard automatically.
Duplicate a project
Duplicate a project to reuse its tasks and sections without starting from scratch. You can duplicate one project at a time.
- Click the three dots icon next to the project name.
- Select Project actions.
- Select Duplicate.
- Open the duplicated project in the sidebar. The project name starts with Copy of.
- Change the project name.
Quick tip
- Tap Browse at the bottom-right.
- Open a project.
- Tap the three dots icon at the top-right.
- Select Project Actions.
- Select Duplicate. You'll see a confirmation notice at the bottom of the screen.
- Tap Show to open the duplicated project.
Quick tip
- Tap Browse at the bottom-right.
- Open a project.
- Tap the three dots icon at the top-right.
- Select Project actions.
- Select Duplicate. You'll see a confirmation notice at the bottom of the screen.
- Tap Show to open the duplicated project.
The duplicated project's name starts with Copy of, so you can tell it apart from the original. You can rename it at any time.
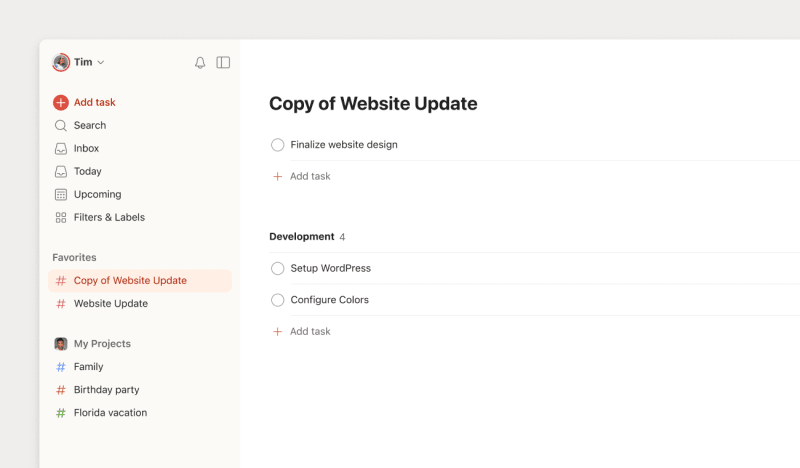
Here’s what's included and not included when you duplicate a project:
| Included | Not included |
|---|---|
| Project name and color | Task reminders |
| Project description | Completed tasks and archived sections |
| Chosen view | Project and task comments |
| Chosen sorting, grouping, or filtering options | Favorites: a duplicated project isn’t a favorite by default. You can add it to your favorites later. |
| Active sections, tasks, and sub-tasks (with respective dates, priorities, and labels) | Sharing settings: a duplicated project is private by default. You can share it later. |
| Sub-projects: you can duplicate them individually the same way as parent projects. |
Share a project
Productivity is often a team sport. You can invite people to any project to delegate tasks and stay updated on progress together.
- Open the project from the sidebar.
- Click Share at the top-right.
- Enter the name or email address of the person to invite to the project.
- Click Invite to confirm.
If the person you're inviting doesn't already have a Todoist account, they’ll receive a project invite email with the option to sign up for a free account.
You can share a project in two ways:
- Share Link: share a link to the project
- Invite via name or email: invite a specific person by their name or email address
To invite someone by name or email:
- Tap Browse at the bottom-right.
- Open the project.
- Tap the add person icon, or the group icon if you already share the project.
- Select Invite via name or email.
- Choose an existing collaborator from the list, or enter a name or email address in the To: field.
- Tap Invite at the top-right.
- Tap Done to close the Share screen.
To share a link to the project instead, tap the add person icon or group icon, then select Share Link.

Rachel · Customer Experience Specialist
You can share a project in two ways:
- Share Link: share a link to the project
- Invite via name or email: invite a specific person by their name or email address
To invite someone by name or email:
- Open the project from the sidebar.
- Tap the add person icon, or the group icon if you already share the project.
- Select Invite via name or email.
- Choose an existing collaborator from the list, or enter a name or email address in the To: field.
- Tap Invite at the top-right.
- Tap Done to close the Share screen.
To share a link to the project instead, tap the add person icon or group icon, then select Share Link.
Rachel · Customer Experience Specialist
You can share a project in two ways:
- Share Link: share a link to the project
- Invite via name or email: invite a specific person by their name or email address
To invite someone by name or email:
- Tap Browse at the bottom-right.
- Open the project.
- Tap the add person icon, or the group icon if you already share the project.
- Select Invite via name or email.
- Choose an existing collaborator from the list, or enter a name or email address in the To: field.
- Tap the send icon to confirm.
To share a link to the project instead, tap the add person icon or group icon, then select Share Link.
Everyone you share your project with will have full access to all the information, like tasks, comments, and file attachments. Likewise, they can add new tasks, assign tasks, complete tasks, add comments, and upload new files.
Share a parent project
If you share a parent project with someone, they won't automatically have access to its sub-projects. You'll need to send them a project invitation for each sub-project.
Accept or ignore a project invitation
Other people can invite you to their projects too. When someone does, a notification appears in Todoist. Accept the invitation to join the project. You can see all your invitations in the Notifications tab.
You don’t have to accept an invitation. If you don’t recognize the person or the project, leave the invitation unaccepted and you won’t join.
Todoist can also accept project invites for you automatically, but only from people whose invites you’ve accepted before or from members of your Todoist team. To turn this on or off, see Accept project invites automatically.
Archive a project
Archive a project you don't need right now. Archiving removes it from your projects list, and you can view or restore it at any time.
- Click the three dots icon beside the project in the sidebar.
- Select Archive from the menu.
- Click Archive to confirm.
Restore an archived project
- Click My Projects or your team name.
- Toggle the Archived projects only option on. You'll see a list of archived projects.
- Find the archived project and click the three dots icon next to its name.
- Select Unarchive.
- Tap Browse at the bottom-right.
- Open the project you want to archive.
- Tap the three dots icon at the top-right.
- Tap Archive.
- Tap Archive for me to confirm. If this is a team project, tap Archive for everyone.
Quick tip
Restore an archived project
- Tap Browse at the bottom-right.
- Tap Manage Projects in My Projects.
- Select Archived projects in the Project type menu.
- Open the project you want to restore.
- Tap Unarchive at the bottom.
- Tap Unarchive for me to confirm. If this is a team project, tap Unarchive for everyone.
- Tap Browse at the bottom-right.
- Open the project you want to archive.
- Tap the three dots icon at the top-right.
- Select Archive.
- Tap Archive for me to confirm. If this is a team project, tap Archive for everyone.
Restore an archived project
- Tap Browse at the bottom-right.
- Tap Manage projects.
- Select Archived projects in the Project type menu.
- Open the project you want to restore.
- Tap the three dots icon at the top-right.
- Select Unarchive.
- Tap Unarchive for me to confirm. If this is a team project, tap Unarchive for everyone.
Note
Delete a project
Delete a project when you no longer need it. If you might need it again later, archive it instead.
Delete a personal project
- Open the project you want to delete in the sidebar.
- Click the three dots icon at the top-right.
- Select Delete.
- Click Delete again to confirm.
Delete a team project
Note
- Open the team project you want to delete in the sidebar.
- Click the three dots icon at the top-right.
- Select Archive.
- Click Archive again to confirm.
- Click your team name in the sidebar.
- Toggle the Archived projects only option on. You'll see a list of archived team projects.
- Find the archived project and click the three dots icon next to its name.
- Select Delete.
- Click Delete again to confirm.
Delete a personal project
- Tap Browse at the bottom-right.
- Open the project.
- Tap the three dots icon at the top-right.
- Select Delete.
- Tap Delete again to confirm.
Delete a team project
Note
- Tap Browse at the bottom-right.
- Open the project.
- Tap the three dots icon at the top-right.
- Tap Archive.
- Tap Archive again to confirm.
- Tap back to the navigation and select your team name.
- Tap Active projects in the Project type menu.
- Select Archived projects. You'll see a list of archived team projects.
- Open the archived project you want to delete.
- Tap the three dots icon.
- Select Delete.
- Tap Delete to confirm.
Delete a personal project
- Tap Browse at the bottom-right.
- Open the project.
- Tap the three dots icon at the top-right.
- Tap Delete.
- Tap Delete again to confirm.
Delete a team project
Note
- Tap Browse at the bottom-right.
- Open the project.
- Tap the three dots icon at the top-right.
- Select Archive.
- Tap Archive for everyone to confirm.
- Tap back to the navigation and select your team name.
- Tap Active projects in the Project type menu.
- Select Archived projects. You'll see a list of archived team projects.
- Open the archived project you want to delete.
- Tap the three dots icon at the top-right.
- Select Delete.
- Tap Delete again to confirm.
Note
Restore a deleted project
If you're a Pro or Business customer, Todoist automatically backs up your data once a day, and on days you've made changes to your projects or tasks. You can store up to 21 backups.
If you need to restore a deleted project, use a backup created before the deletion or a project CSV file you saved to your computer. Then, create a new project and import the project CSV file into it. Learn more about backups in Todoist.
Get started
Ready to start working on your projects? We hope this guide gives you the tools to work on that idea you’ve had brewing for months. If you still feel overwhelmed and don’t know where to start, check out the Todoist template gallery for dozens of curated templates.
If you’re having trouble creating or managing your projects, get in touch with us.