Vaše cesta ke klidu a dosahování cílů začíná prvním úkolem. Úkol prakticky na cokoli můžete zadat jednoduchými, přirozenými frázemi. Nezáleží na tom, jak rychle lze úkol splnit (Zavolat mámě dnes), nebo o jak časově náročný úkol se jedná (Napsat úvod k diplomové práci ve 14:00 po dobu 3 hodin), do Todoistu můžete rychle sypat úkoly z hlavy, ať na ně nemusíte myslet.
Rychlý tip
Přidání úkolu
Začneme vytvořením prvního úkolu:
Úkol přidáte tak, že kliknete na volbu Přidat úkol buď na bočním panelu, nebo ve spodní části každého seznamu. Úkol si pojmenujte a přirozeným jazykem mu přiřaďte datum. Přidání úkolu potvrďte kliknutím na Přidat úkol.
Stacey · Specialista zákaznické zkušenosti
Q otevřete rychlé přidání. Pokud právě používáte jinou aplikaci, využijte globální zkratku rychlého přidání.
Klepnutím na červené tlačítko dynamického přidání vpravo dole otevřete vytváření úkolu. Úkol si pojmenujte a přirozeným jazykem mu přiřaďte datum. Pak vše potvrďte klepnutím na ikonu potvrzení.
Rychlý tip
Klepnutím na červené tlačítko dynamického přidání vpravo dole otevřete vytváření úkolu. Úkol si pojmenujte a přirozeným jazykem mu přiřaďte datum. Pak vše potvrďte klepnutím na ikonu odeslání.
Rychlý tip
Úprava úkolu
K úkolu možná budete potřebovat doplnit kontext, obzvlášť pokud pracujete s ostatními. Úkol upravíte a další podrobnosti přidáte následovně:
Kliknutím na samotný úkol otevřete zobrazení úkolu. Můžete změnit název úkolu nebo přidat popis. Kliknutím na Uložit vše potvrdíte.
V zobrazení úkolu můžete změnit datum nebo přidat další informace, například prioritu, štítky nebo připomenutí. Díky tomu můžete úkoly uspořádat podle jejich naléhavosti nebo kategorie.
Klepnutím na stávající úkol otevřete zobrazení úkolu. Pak klepněte na název úkolu a přepište ho, případně doplňte popis. Vše potvrďte klepnutím na Uložit.
V zobrazení úkolu můžete změnit datum nebo přidat další informace, například prioritu, štítky nebo připomenutí. Díky tomu můžete úkoly uspořádat podle jejich naléhavosti nebo kategorie.
Zkopírování odkazu na úkol
Jistě někdy nastane situace, kdy si budete chtít zkopírovat odkaz na úkol do svých poznámek nebo ke sdílení s ostatními, kteří na projektu pracují. Přes tento odkaz úkol zobrazíte v Todoistu na libovolné platformě.
- Zobrazte úkol kliknutím.
- Vpravo nahoře klikněte na ikonu se třemi tečkami.
- Vyberte možnost Zkopírovat odkaz na úkol.
Odkaz na úkol se automaticky zkopíruje do schránky.
Rychlý tip
- Zobrazte úkol klepnutím.
- Vpravo nahoře klepněte na ikonu se třemi tečkami.
- Vyberte možnost Zkopírovat odkaz na úkol.
Odkaz se automaticky zkopíruje do schránky.
Rychlý tip
- Zobrazte úkol klepnutím.
- Vpravo nahoře klepněte na ikonu se třemi tečkami.
- Vyberte možnost Zkopírovat odkaz na úkol.
Odkaz na úkol se automaticky zkopíruje do schránky.
Pokud používáte Android 12, můžete zkopírovat odkaz na úkol z nedávno použitých aplikací:
- Zobrazte úkol klepnutím.
- Přejděte do přehledu nedávných aplikací v zařízení s Androidem.
- Klepněte na ikonu odkazu v náhledu Todoistu.
Duplikování úkolu
Pokud potřebujete vytvořit kopie úkolu, můžete si ušetřit čas a práci duplikováním úkolu a všech jeho aktivních dílčích úkolů. Kopie se zobrazí v seznamu úkolů hned pod daným úkolem, nebudou však obsahovat komentáře, vlastní připomenutí ani dokončené dílčí úkoly z původního úkolu. Pokud chcete nějaké informace zachovat, přidejte je do popisu úkolu ještě před jeho duplikováním.
Duplikování jednoho úkolu
Klikněte na ikonu se třemi tečkami napravo od názvu úkolu. Pokud se nacházíte v zobrazení úkolu, klikněte na ikonu se třemi tečkami vpravo nahoře. Pak zvolte Duplikovat. V seznamu se objeví kopie úkolu.
- Klepnutím na úkol otevřete zobrazení úkolu.
- Vpravo nahoře klepněte na ikonu se třemi tečkami.
- Zvolte Duplikovat úkol.
Rychlý tip
- Klepnutím na úkol otevřete zobrazení úkolu.
- Vpravo nahoře klepněte na ikonu se třemi tečkami.
- Zvolte Duplikovat úkol.
Duplikování dvou nebo více úkolů
Při kliknutí na první a poslední úkol, které chcete duplikovat, stiskněte a podržte klávesu ⇧ Shift. Tím vyberete všechny úkoly v seznamu.
Pokud chcete vybrat úkoly, které v seznamu nejsou vedle sebe, při klikání na jednotlivé úkoly držte stisknutou klávesu ⌘ Command (macOS) nebo CTRL (Windows).
- V nabídce, která se objeví v horní části Todoistu, klikněte na ikonu se třemi tečkami.
- Zvolte Duplikovat.
Pod každým původním úkolem se vytvoří kopie úkolů a jejich aktivních dílčích úkolů.
- Vpravo dole klepněte na Procházet.
- Otevřete projekt, filtrované zobrazení nebo zobrazení štítku.
- Přejetím přes jednotlivé úkoly doprava je vyberte.
- Vpravo dole klepněte na ikonu se třemi tečkami.
- Vyberte možnost Duplikovat úkoly. Uvidíte počet úkolů, které se v Todoistu zduplikují.
Pod každým původním úkolem se vytvoří kopie úkolů a jejich aktivních dílčích úkolů.
- Vpravo dole klepněte na Procházet.
- Otevřete projekt, filtrované zobrazení nebo zobrazení štítku.
- Vpravo nahoře klepněte na ikonu se třemi tečkami.
- Klepněte na Vybrat úkoly.
- Klepnutím na jednotlivé úkoly v seznamu je vyberete. Budou zvýrazněné šedě.
- Vpravo dole klepněte na ikonu se třemi tečkami.
- Zvolte Duplikovat úkoly. Uvidíte počet úkolů, které se v Todoistu zduplikují.
Pod každým původním úkolem se vytvoří kopie úkolů a jejich aktivních dílčích úkolů.
Přesunutí úkolu
Může se stát, že si po přidání několika úkolů do různých projektů uvědomíte, že jeden úkol je potřeba v seznamu úkolů přesunout dolů nebo do jiného projektu. Uděláte to následovně:
Přesunutí úkolu v rámci projektu
Pokud používáte rozvržení seznamu:
- Umístěte ukazatel myši na levou stranu úkolu.
- Nalevo od úkolu klikněte na ikonu táhla přetažení.
- Přetáhněte úkol na nové místo v seznamu úkolů.
Pokud používáte rozvržení nástěnky, úkol podržte. Pak ho v seznamu úkolů přetáhněte na novou pozici.
- Vpravo dole klepněte na Procházet.
- Klepnutím otevřete a zobrazte projekt.
- Podržte úkol.
- Úkol přetáhněte v seznamu úkolů na novou pozici.
- Vpravo dole klepněte na Procházet.
- Klepnutím otevřete a zobrazte projekt.
- Podržte úkol.
- Úkol přetáhněte v seznamu úkolů na novou pozici.
Přesunutí úkolu do jiného projektu
Vedle názvu úkolu klikněte na ikonu se třemi tečkami.
Pokud přesouváte dva nebo více úkolů, vyberte je podržením klávesy ⌘ Command (macOS) nebo CTRL (Windows).
- Zvolte Přesunout do... a zadejte buď název projektu, nebo název oddílu.
- Vpravo dole klepněte na Procházet.
- Otevřete projekt nebo zobrazení.
- Vpravo nahoře klepněte na ikonu se třemi tečkami.
- Klepněte na možnost Vybrat úkoly.
- Klepněte na úkoly, které chcete přesunout do jiného projektu. Jsou zvýrazněny šedě.
- Vyberte ikonu Přesunout do....
- Zadejte název projektu nebo název oddílu.
Rychlý tip
- Vpravo dole klepněte na Procházet.
- Otevřete projekt nebo zobrazení.
- Vpravo nahoře klepněte na ikonu se třemi tečkami.
- Klepněte na možnost Vybrat úkoly.
- Klepněte na úkoly, které chcete přesunout do jiného projektu. Jsou zvýrazněny šedě.
- Dole klepněte na ikonu Přesunout do....
- Zadejte název projektu nebo název oddílu.
Dokončení úkolu
Vedle každého úkolu v Todoistu je ikona kroužku. Na tuto ikonu kroužku klikněte nebo klepněte vždy, když úkol dokončíte. Úkol zmizí ze seznamu, zaznamená se do vašeho Přehledu a započítá se vám jako bod do Karmy.
Pokud používáte zařízení Apple nebo zařízení s Androidem, akce přejetí si můžete v Todoistu přizpůsobit. Klepněte na Nastavení → Obecné → Akce přejetím a vyberte akci Dokončit.
Pokud si prohlížíte zobrazení dokončeného úkolu a potřebujete v něm provést změny, nejdřív zrušte jeho dokončení. Potom proveďte změny a pak ho teprve znovu dokončete.
Galina · Vedoucí týmu zákaznické zkušenosti
Zapnutí zvuku dokončeného úkolu
Zvuk dokončení úkolu vás při práci povzbudí. Pokud to chcete vyzkoušet, zapněte si zvuk následovně:
- Vlevo nahoře klikněte na svého avatara.
- Vyberte Nastavení.
- Otevřete záložku Obecné.
- Posuňte zobrazení dolů na oddíl Zvukové efekty.
- Zvuk dokončeného úkolu si můžete zapnout pro počítačové a webové aplikace nebo pro mobilní aplikaci.
Při dokončení každého úkolu se v Todoistu ozve zvuk.
- Vpravo dole klepněte na Procházet.
- Klepněte na ikonu ozubeného kolečka.
- Klepněte na Obecné.
- Posuňte zobrazení dolů a v části Zvuk klepněte na Zvuk dokončeného úkolu.
- Zvuk dokončeného úkolu si můžete zapnout pro mobilní aplikaci nebo pro počítačové a webové aplikace.
Při dokončení každého úkolu se v Todoistu ozve zvuk.
- Vpravo dole klepněte na Procházet.
- Vpravo nahoře klepněte na ikonu ozubeného kolečka.
- Klepněte na Obecné.
- Posuňte zobrazení dolů na ZVUK a klepněte na Zvuk dokončeného úkolu.
- Funkci zapněte přepínačem na mobilním zařízení nebo na počítači a webu.
Při dokončení každého úkolu se v Todoistu ozve zvuk.
Zrušení dokončení úkolu
Pokud dokončíte úkol, který jste ale dokončit nechtěli, nebo pokud potřebujete vrátit dokončený úkol zpět, dokončení můžete samozřejmě zrušit.
- Z bočního projektu otevřete projekt.
- Vpravo nahoře klikněte na Zobrazit.
- Zapněte Dokončené úkoly.
- Najděte dokončený úkol a klikněte na ikonu kroužku.
- Vpravo dole klepněte na Procházet.
- Klepnutím na projekt otevřete jeho zobrazení.
- Vpravo nahoře klepněte na ikonu se třemi tečkami.
- Vyberte Zobrazit.
- Zapněte Dokončené úkoly.
- Najděte dokončený úkol a klepněte na ikonu zaškrtávací značky.
- Vpravo dole klepněte na Procházet.
- Klepnutím na projekt otevřete jeho zobrazení.
- Vpravo nahoře klepněte na ikonu se třemi tečkami.
- Vyberte Zobrazit.
- Zapněte možnost Dokončené úkoly.
- Najděte dokončený úkol a klepněte na ikonu zaškrtávací značky.
Poznámka
Zrušení dokončení úkolu s opakujícím se datem
Jakmile odškrtnete úkol s opakujícím se datem, v levém dolním rohu Todoistu se jen na několik sekund objeví vyskakovací okno Vrátit zpět.
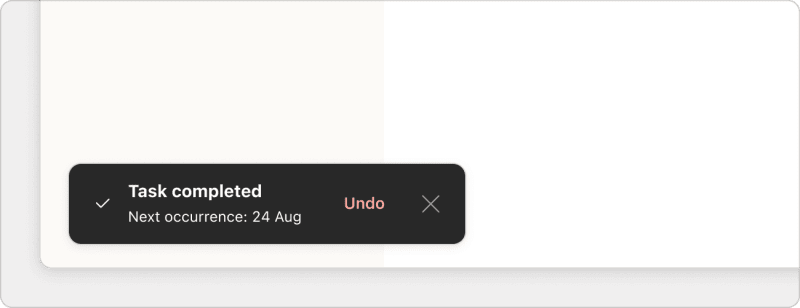
Jakmile vyskakovací okno zmizí, dokončení úkolu už nebude možné zrušit. Místo toho buď vytvořte nový úkol, nebo stávající úkol změňte na opakující se datum, které bude začínat v předchozí instanci.
Na rozdíl od úkolů s pevným datem nelze u předchozích výskytů úkolu zrušit dokončení a předchozí výskyty nelze ani vrátit zpět. Pokud máte úkol „Koupit ovoce everyday“ a dokončili jste několik výskytů tohoto úkolu v minulosti, vrátit můžete změny pouze u dnešního výskytu.
Smazání úkolu
Vyčistěte si projekty smazáním omylem vytvořených úkolů nebo úkolů, které už nejsou relevantní. Jakmile úkol smažete, v projektu už ho nepůjde obnovit.
- Klikněte na projekt nebo zobrazení.
- Klikněte na ikonu se třemi tečkami napravo od úkolu. Pokud používáte zobrazení úkolu, klikněte na ikonu se třemi tečkami v pravém horním rohu okna.
- Vyberte Smazat.
- Potvrďte opětovným kliknutím na Smazat.
- Vpravo dole klepněte na Procházet.
- Klepnutím otevřete projekt nebo zobrazení.
- Zobrazte úkol klepnutím.
- Vpravo nahoře klepněte na ikonu se třemi tečkami.
- Zvolte Smazat úkol.
- Potvrďte klepnutím na Smazat úkol.
Rychlý tip
- Vpravo dole klepněte na Procházet.
- Klepnutím otevřete projekt nebo zobrazení.
- Zobrazte úkol klepnutím.
- Vpravo nahoře klepněte na ikonu se třemi tečkami.
- Vyberte možnost Smazat úkol.
- Potvrďte klepnutím na ANO.
Poznámka
Osvědčené postupy při práci s úkoly
Úkoly jsou základním stavebním kamenem vašeho projektu, proto uvádíme několik osvědčených postupů, které při přidávání úkolů a práci s nimi považujeme za velice užitečné.
První slovo úkolu by mělo nasměrovat k akci
Když přidáváte úkol, začněte slovesem nebo jiným slovem navádějícím k akci, ať si jasně určíte směr toho, co je potřeba udělat. Pokud chcete zítra v 10 ráno koupit jablka, přidejte si úkol „Koupit jablka tomorrow at 10:00“ namísto třeba „Jablka tom 10:00“.
Velké úkoly rozdělujte do dílčích úkolů
Povzneste se nad zahlcení tak, že si velký úkol rozdělíte do dílčích úkolů. To se hodí u všech úkolů, u kterých je potřeba dokončit dva nebo více kroků, případně u úkolů, kterým budete muset věnovat víc než 24 hodin.
Přidání všech souvisejících podrobností
K úkolu můžete přidat podrobnosti jako datum, čas, štítek nebo prioritu. Je tedy snadné uspořádat si úkoly podle toho, kdy na nich máte začít pracovat, podle kategorie nebo třeba priority. Pokud máte placený tarif, můžete přidávat taky termíny dokončení a vlastní připomenutí.
Do popisu úkolu uveďte kontext
Pokud na úkolu spolupracujete s jedním nebo více lidmi, popis úkolu vám poskytne dostatek prostoru k naformátování a nasdílení podrobností o práci, včetně odkazů, citací, odrážek a dalších informací.
K úkolu přidejte související obrázky nebo soubory
Ať už spolupracujete napříč odděleními, nebo potřebujete dát mamince fotku květin, které má koupit, k úkolům můžete připojovat obrázky nebo soubory. Díky tomu najdete veškeré potřebné informace a můžete na ně odkazovat na jednom centrálním místě.
Ozvěte se nám
Pokud máte s přidáváním úkolů do projektů potíže, nedaří se vám změnit stávající úkol nebo vám nejde spravovat úkoly spolu s ostatními, kontaktujte nás. My – Galina, Diane, Rikke a kdokoli další z našeho týmu – vám rádi pomůžeme problémy vyřešit, aby vás při práci nic nebrzdilo.